Quick Start Guide
Introduction
This guide is designed to get you up and running with Stripes as quickly as possible. It contains a section on configuring Stripes in a web application, and another on developing your first Stripes application.
Requirements
Stripes makes significant use of several features in Java 1.5 such as Annotations and Generics. It also relies heavily on several Servlet 2.4/JSP 2.0 features. As a result you will need a 1.5 JDK (now available for most major platforms), and a Servlet Container that supports Servlet 2.4. Such containers include Tomcat 5.x, which is free (Apache license), and newer versions Caucho's excellent Resin, which is also free (GPL license).
It is also expected that the reader has some experience with JSP development, and understands that there exists an Expression Language, though not necessarily too much about it.
Configuring Stripes
Stripes is designed to require as little configuration as possible. To get it up and running you simply need to configure the Stripes Filter with a parameter and the Stripes Dispatcher Servlet in your web application's web.xml. A pretty standard configuration would look like this:
The ActionResolver.Packages parameter
Stripes auto-discovers your ActionBeans at deployment time by scanning your web application's classpath. This saves you from having to enumerate all your ActionBeans somewhere, but you do have to give Stripes some starting points. To do so, use the ActionResolver.Packages init-param of the Stripes Filter to indicate one or more package roots. Do not use .* at the end of a package; subpackages are automatically included. Use commas to separate multiple package roots.
The ActionResolver.Packages is the only required init-param for the Stripes Filter.
Next you'll need to drop stripes.jar into your classpath, usually in your /WEB-INF/lib directory. This is the only compile-time dependency for developing with Stripes. For deploying and running Stripes you will also need to copy the following library files supplied with Stripes into your classpath:
commons-logging.jar (1.1)- Apache Commons Logging is used to provide an implementation agnostic logging interface.cos.jar- the com.oreilly.servlets package, courtesy of Jason Hunter, is used to manage multi-part file uploads as part of form submissions
The above libraries are all supplied in the Stripes distribution, and have been tested with Stripes. More recent versions may work, but your mileage may vary.
In addition, it's very helpful to be able to see the logging output of Stripes. To do this you'll need to supply either a working Log4J setup, or another Commons Logging compatible setup. The Log4J jar, log4j-1.2.9.jar, is distributed with Stripes. Sample Commons Logging and Log4J configuration files follow:
org.apache.commons.logging.Log=org.apache.commons.logging.impl.Log4JLogger
 ### direct log messages to stdout ###
log4j.appender.stdout=org.apache.log4j.ConsoleAppender
log4j.appender.stdout.Target=System.out
log4j.appender.stdout.layout=org.apache.log4j.PatternLayout
log4j.appender.stdout.layout.ConversionPattern=%d{ABSOLUTE} %5p %c{1}:%L - %m%n

### direct messages to file ###
log4j.appender.file=org.apache.log4j.FileAppender
log4j.appender.file.File=/tmp/stripes.log
log4j.appender.file.layout=org.apache.log4j.PatternLayout
log4j.appender.file.layout.ConversionPattern=%d{ABSOLUTE} %5p %c{1}:%L - %m%n

### set log levels - for more verbose logging change 'info' to 'debug' ###
log4j.rootLogger=INFO, stdout, file
log4j.logger.net.sourceforge.stripes=DEBUG
The logging configuration files need to be placed in your classpath, for example in /WEB-INF/classes.
The last piece to put in place is the StripesResources.properties; you'll want to copy that to /WEB-INF/classes for now. StripesResources.properties is used (by default) to lookup error messages both for Stripes' built in validations, and for any validation done in ActionBeans, and it has to be available in the Classpath. An example fragment of the file follows:
 # Validation error messages used by Stripes' built in type converters
converter.number.invalidNumber=The value ({1}) entered in field {0} must be a valid number
converter.byte.outOfRange=The value ({1}) entered in field {0} was out of the range {2} to {3}
converter.short.outOfRange=The value ({1}) entered in field {0} was out of the range {2} to {3}
converter.integer.outOfRange=The value ({1}) entered in field {0} was out of the range {2} to {3}
converter.float.outOfRange=The value ({1}) entered in field {0} was out of the range {2} to {3}
converter.enum.notAnEnumeratedValue=The value "{1}" is not a valid value for field {0}
converter.date.invalidDate=The value ({1}) entered in field {0} must be a valid date
converter.email.invalidEmail=The value ({1}) entered is not a valid email address
...
My First Stripes Application
As a first application we'll develop a simple, one page calculator that can take two numbers and perform additions, and maybe some other operations later. First off, lets get the JSP into shape. The following is a first cut at a JSP. You'll want to put it in a directory called 'quickstart' off your web application root.
The JSP
<%@ page contentType="text/html;charset=UTF-8" language="java" %>
<%@ taglib prefix="stripes" uri="http://stripes.sourceforge.net/stripes.tld"%>

<!DOCTYPE html PUBLIC "-//W3C//DTD XHTML 1.0 Strict//EN" "http://www.w3.org/TR/xhtml1/DTD/xhtml1-strict.dtd">
<html>
<head><title>My First Stripe</title></head>
<body>
<h1>Stripes Calculator</h1>

Hi, I'm the Stripes Calculator. I can only do addition. Maybe, some day, a nice programmer
will come along and teach me how to do other things?

<stripes:form beanclass="net.sourceforge.stripes.examples.quickstart.CalculatorActionBean" focus="">
    <table>
        <tr>
            <td>Number 1:</td>
            <td><stripes:text name="numberOne"/></td>
        </tr>
        <tr>
            <td>Number 2:</td>
            <td><stripes:text name="numberTwo"/></td>
        </tr>
        <tr>
            <td colspan="2">
                <stripes:submit name="addition" value="Add"/>
            </td>
        </tr>
        <tr>
            <td>Result:</td>
            <td>${actionBean.result}</td>
        </tr>
    </table>
</stripes:form>
</body>
</html>
The first interesting thing in the page above is the second line (the one beginning <%@ taglib .... That imports the Stripes Tag Library for use within the page. Then, a little lower, the line:
<stripes:form beanclass="net.sourceforge.stripes.examples.quickstart.CalculatorActionBean" focus="">
opens up a stripes:form tag. The Stripes form tag does a bunch of things we won't go into here, and ultimately produces a regular html form tag on when the page is rendered. The focus="" tells Stripes to automatically set focus into the first visible field (or the first field with errors when there are errors).
Next, we see two tags, something like:
<stripes:text name="numberOne"/>
This is the Stripes equivelant of a <input type="text"/> tag, but provides functionality for pre-populating, re-populating, and changing display when there are validation errors. The name numberOne corresponds to the name of a property on the ActionBean that will receive the request.
Instead of a <input type="submit"> we see:
<stripes:submit name="addition" value="Add"/>
The Stripes submit tag has additional functionality to render localized Strings on the button, but that's more than we need here, so the tag simply uses the value attribute. The name of the submit button, addition, is very important as this is tied to the method that will be invoked on the ActionBean receiving the request.
Lastly, a small EL expression is used to print the result property of the ActionBean if it is present.
<td>${actionBean.result}</td>
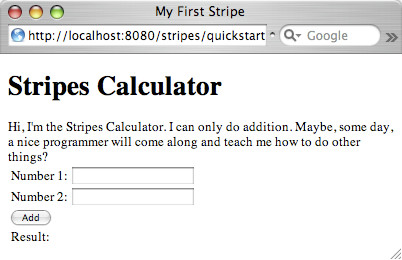
We're now ready to preview our page! When the page first renders there is no ActionBean present (one is not instantiated by the form tag, and we haven't posted this form).
Calculator example page after writing the just the JSP
The ActionBean
An ActionBean is the object that receives the data submitted in requests and processes the user's input. It both defines the properties of the form, and the processing logic for the form. To compare to Struts, the ActionBean is like the ActionForm and the Action put together in one class.
It should be mentioned at this point that there is no need for any external configuration to let Stripes know about the ActionBean implementations in an application, nor to tie together the JSP page and ActionBean. All of the information necessary is in the ActionBean itself. Let's take a look at the simple ActionBean that receives the Calculator's request.
package net.sourceforge.stripes.examples.quickstart;

import net.sourceforge.stripes.action.DefaultHandler;
import net.sourceforge.stripes.action.Resolution;
import net.sourceforge.stripes.action.ForwardResolution;
import net.sourceforge.stripes.action.ActionBean;
import net.sourceforge.stripes.action.ActionBeanContext;

/**
* A very simple calculator action.
* @author Tim Fennell
*/
public class CalculatorActionBean implements ActionBean {
    private ActionBeanContext context;
    private double numberOne;
    private double numberTwo;
    private double result;

    public ActionBeanContext getContext() { return context; }
    public void setContext(ActionBeanContext context) { this.context = context; }

    public double getNumberOne() { return numberOne; }
    public void setNumberOne(double numberOne) { this.numberOne = numberOne; }

    public double getNumberTwo() { return numberTwo; }
    public void setNumberTwo(double numberTwo) { this.numberTwo = numberTwo; }

    public double getResult() { return result; }
    public void setResult(double result) { this.result = result; }

    @DefaultHandler
    public Resolution addition() {
        result = getNumberOne() + getNumberTwo();
        return new ForwardResolution("/quickstart/index.jsp");
    }
}
Notice that we used the ActionBean's class name in the stripes:form tag. Nevertheless, it's good to know how Stripes goes from the class name to a URL. If you look at the generated code, you'll see action="/examples/quickstart/Calculator.action in the HTML. By default Stripes will examine ActionBeans and determine their URL based on their class and package names. To convert class names to URLs Stripes:
- Removes any package names up to and including packages called 'web', 'www', 'stripes' and 'action'
- Removes 'Action' and 'Bean' (or 'ActionBean') if it is the last part of the class name
- Converts it to a path and appends '.action'
So in the above case, net.sourceforge.stripes.examples.quickstart.CalculatorActionBean became:
- examples.quickstart.CalculatorActionBean
- examples.quickstart.Calculator
- /examples/quickstart/Calculator.action
The URL generated from the class name matches the action generated by the stripes:form tag. In both cases this is relative to the web application root. You can read more about how this is handled (and how to change the conversion to create different URLs) in the JavaDoc for NameBasedActionResolver.
Overriding URL Bindings
The URLs generated by Stripes are just defaults. To override the URL that an ActionBean is bound to all you have to do is annotate the class with the @UrlBinding annotation. For example we could have written @UrlBinding("/qs/calc") public class CalculatorActionBean ...
Next, the class declaration looks like
public class CalculatorActionBean implements ActionBean
ActionBean (if you hadn't gathered by this point) is an interface, not a base class. As a result, your ActionBeans may extend any class you like. The ActionBean interface defines two methods, which we see implemented in the class as:
public ActionBeanContext getContext() { return context; }
public void setContext(ActionBeanContext context) { this.context = context; }
These methods provide the ActionBean with access to the ActionBeanContext which provides access to the HttpServletRequest and HttpServletResponse for when you need them (hopefully not often), as well as other information about the current request (e.g. error messages).
While the individual getters and setters for the properties defined on the ActionBean are not really that interesting, it should be noted that they are necessary (unless properties are public, but that's discouraged). Stripes accesses values on ActionBeans through standard JavaBean getter and setter methods, and if they do not exist you will get errors. The three properties (and hence getter/setter pairs) on the ActionBean correspond to the names used on the JSP.
Then the really interesting bit.
@DefaultHandler
public Resolution addition() {
    result = numberOne + numberTwo;
    return new ForwardResolution("/quickstart/index.jsp");
}
Because this method is public and returns a Resolution Stripes will identify it as a handler method. When a request comes to the CalculatorActionBean, and the user hit a submit button or image button with the name (name not value) "addition", that this method will be invoked. Just like with the URL above, the name of the event that a method handles can be overridden using the @HandlesEvent annotation.
The @DefaultHandler annotation tells Stripes that if it cannot determine what button the user hit (often because the user hit enter instead of clicking a button) that this method should be invoked.
You might have realized at this point that there is no execute() or do() or other generic sounding method in the ActionBean interface. All the execute() style methods are regular Java methods that have a recognizable signature (public, non-abstract, return Resolution) or have been annotated to let Stripes know about them. Stripes refers to these as Handler methods, since they handle events from the browser. Handler methods usually return a Resolution, which tell Stripes what to do next (they may return anything, but if it is not a Resolution, Stripes will ignore it).
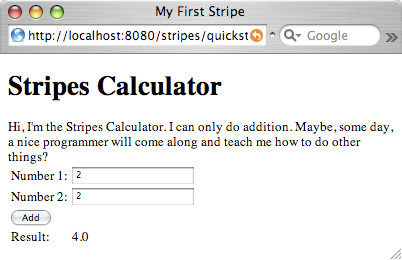
Our method adds the two numbers together and stores the sum in the result property and then forwards to the same JSP we came from by returning a ForwardResolution. That's it!
Now the ActionBean is written, we can add two plus two
That simple JSP, and short ActionBean class are all that's needed to put together a working example in Stripes. But for extra credit we can do more.
Adding Validation
Let's say, first off, that we'd like to add a little validation to the page. It's safe to say that a user should always enter both numbers to do an addition. To do this we simply annotate the properties of the ActionBean. This can be done on either the properties themselves, on the getter methods, or on the setter methods. While it's possible to mix and match, it is suggested that you pick one element type (property or getter or setter) and annotate consistently across your ActionBeans. For example (don't forget to import the Validate class):
@Validate(required=true) private double numberOne;
@Validate(required=true) private double numberTwo;
Now if a user forgets to enter either or both values one or more validation errors will be generated. To display the error to the user we need to add a tag to the JSP. We might make the following edit:
<stripes:form beanclass="net.sourceforge.stripes.examples.quickstart.CalculatorActionBean">
<stripes:errors/>
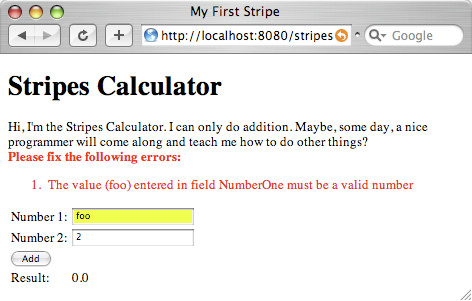
The <stripes:errors/> tag will output any validation errors for the form if there are any present. It's presentation is customizable, but we won't go into that here. In addition, any form field that is in error will have it's css class attribute changed to error. So if we were to add the following to the HTML head, fields in error would get yellow backgrounds.
<style type="text/css">
    input.error { background-color: yellow; }
</style>
What about validating that the value supplied is actually a number? Actually Stripes is one step ahead of us. It knew that the properties numberOne and numberTwo were of type double and it already applied validations that are applicable for doubles. Go ahead, try putting in a bunch of letters! It'll look like this:
Validation in Action(Beans)!
Adding (or should I say Dividing) another Operation
This is great and all, but what if we wanted to build out some other operations? Say division? Well, it turns out that's pretty straightforward. First we make a quick addition to the JSP:
<td colspan="2">
    <stripes:submit name="addition" value="Add"/>
    <stripes:submit name="division" value="Divide"/>
</td>
Next we add a new Handler method to the ActionBean:
public Resolution division() {
    result = numberOne / numberTwo;
    return new ForwardResolution("/quickstart/index.jsp");
}
The validations we defined earlier apply when the "division" event is fired, just like when the "addition" event is fired. However, we should probably ensure that when a division event occurs that the user isn't trying to trick the system into dividing by zero. We could write the validation code in the division() method if we wanted, but instead we'll add a ValidationMethod:
@ValidationMethod(on="division")
public void avoidDivideByZero(ValidationErrors errors) {
    if (this.numberTwo == 0) {
        errors.add("numberTwo", new SimpleError("Dividing by zero is not allowed."));
    }
}
Methods which perform validation are marked with a @ValidationMethod annotation to tell Stripes to run them prior to executing the Handler method. Unless otherwise specified Stripes will execute validation methods for all events; in this case we've restricted the method to be run only on division events. The method is passed a reference to the ValidationErrors object which is used to store validation errors for the current event.
The method checks to see if the denominator is zero and if so, creates an instance of SimpleError to hold an error message. This works, but is rather quick and dirty. A better approach might be to use a LocalizableError and provide it with the key of a message stored in the StripesResources file.
Resources
- The source code for this example application is included in the Stripes Download. Also included is a ready to deploy WAR that includes this example application, as well as...
- The Bugzooky Sample Application is a larger example application that demonstrates some of Stripes' more advanced feature
- The Stripes Documentation section includes reference documentation and How To's


